No products in the cart.
PACKAGING YOUR ARTWORKS FOR SHIPPING
Whether you’ve sold a small artwork on paper, or a 6 foot sculpture, please review our thorough packaging guidelines. You can find this directly in this article.
It’s important to remember that our shipping insurance policy is only honored if you have packaged your artwork according to our guidelines. In the unfortunate event that your artwork is delivered with damage, any deviation for our guidelines will result in your sale not be honored. It’s incredibly important to package precisely according to our guidelines.
How to package your paintings :
IMPORTANT: Always make certain that your painting is completely dry before packaging it for shipment. Sometimes paint can appear dry when it’s not. Since drying time depends on such factors as the type and brand of paint, the drying mediums used (if any), the paint colors, etc., you must research the correct drying time for the specific supplies you’ve used. Our insurance will NOT cover damage to paintings as a result of shipping before the paint was completely dry.
All artworks that are 48 inches or above on any one side need to be packaged into a wood crate.
Paintings smaller than 48”x 48”
What you’ll need:
- Glassine paper or acid-free archival tissue paper
- Plastic sheeting, poly wrap, or heavy plastic bag
- Bubble wrap
- Foam board at least ½” thick
- Packing tape
- Cardboard corner protectors or two-ply cardboard
- Cardboard box
Step 1 – Wrap the painting in glassine paper or acid-free, archival tissue paper. Note that any material that comes into contact with the surface of the work should be archival quality. We advise that you avoid touching the painting’s surface with bare hands by wearing white cotton gloves or placing acid-free tissue paper between the work and your fingers when handling.
Step 2 –Take four (4) 8”x 8” square pieces of glassine paper or acid-free tissue paper (you may adjust the size of the squares to better fit the size of your work) and fold each in half diagonally to create a triangle, then fold in half again to create a triangle pocket. Place one pocket onto each corner of the painting.
Step 3 – Taping only onto the tissue paper corners, tape the wrapped painting to a sheet of foam board (or two-ply cardboard) the same size or slightly larger than the painting for a firm backing.
Step 4 – To protect against moisture, wrap the glassine-covered artwork with plastic sheeting/poly wrap or put it inside a heavy plastic bag. Use tape to seal all areas where water can enter and cause damage.
Step 5 – Wrap the entire work with two (2) layers of bubble wrap for a protective padding. Wrap it as you would a gift, using tape to secure it shut.
Step 6 – Place cardboard corner protectors on the corners of the wrapped artwork.
Step 7 – Place the wrapped artwork between 2 pieces of foam board that are at least ½” thickness (or two-ply cardboard), forming a “sandwich.” Also, the borders of the foam board sheets should extend 2-3 inches beyond all edges of the bubble-wrapped artwork. Use packing tape to bind the foam board sandwich together. Be certain the sides are taped down firmly to ensure that the artwork doesn’t shift around within.
IMPORTANT: Take care not to apply too much pressure to the surface of your artwork. Doing so could create indentations on the stretched canvas.
Step 8 – Place the foam board-covered painting into a cardboard box with approximately three (3) inches of space on all sides. Fill the empty space with enough bubble wrap or wadded/shredded white paper to ensure that the artwork doesn’t shift during transit.
Step 9 – Use the H-taping method to seal the box. The H-taping method involves using long strips of packing tape to completely seal the opening flaps of the box. Use one long strip of tape over the horizontal opening between the two flaps, and two strips over the vertical sides of the flaps—forming an “H.” Apply additional vertical strips of tape as needed across the sealed flaps for added reinforcement. Illustrations of this method are provided by different sources online. Just type “H-taping method” into the Google search box.
Step 10 – Affix the shipping label to the package and put clear tape over the label so it doesn’t get removed during shipment. Using a felt tip pen, write “FRAGILE” in large capital letters on the box, or use ready-made “FRAGILE” labels.
Framed Paintings
What you’ll need:
- Glassine paper or acid-free archival tissue paper
- Plastic sheeting or poly wrap
- Bubble wrap
- Painters tape (if packing a glass frame)
- Cardboard corner protectors
- Packing tape
- Foam board at least ½” thick
- Shredded or wadded white paper
- Very sturdy cardboard box if framed artwork is under 18”x24″
- Custom wooden crate if framed artwork is larger than 18”x24”
Step 1 – Use a sturdy cardboard box or build a custom crate that will fit the framed painting plus approximately three (3) inches of space on all sides. (This extra space will accommodate the layers of bubble wrap to be added.)
Step 2 – If the frame has a protective glass or acrylic pane, remove it from the frame. If it does not, skip to step 4. Apply two pieces of painters tape diagonally across the glass/acrylic pane to form a large “X”. Should the glass break during shipment, the tape will help keep the broken pieces together.
Step 3 – Sandwich the glass/acrylic pane between two sheets of foam board approximately 2 inches larger than the glass on all sides. Firmly seal the foam board sandwich all around with packing tape, making sure that the glass/acrylic panel does not shift around within.
Step 4 – Wrap the painting in acid-free, archival tissue paper or glassine. Note that any material that will come into contact with the surface of the painted work should be archival quality.
Step 5 – To protect against moisture, wrap the artwork with plastic sheeting or poly wrap
Step 6 – Add cardboard corner protectors to the corners of the wrapped work. You can buy corner protectors ready made, or you can construct them yourself. Several online resources offer instructions on how to make them.
Step 7 – Wrap the framed painting in three (3) layers of bubble wrap, using packing tape to secure it.
If your framed painting is larger than 18”x24”, you’ll need to build a wooden crate and seal the work inside. Please follow the steps within the section, Crates.
If your framed painting is under 18”x24”, proceed to Step 8 below.
Step 8 – Sandwich the wrapped painting within two sheets of foam board and tape all the way around to secure it.
Step 9 – Place it inside a sturdy cardboard box. To minimize movement within the box, thoroughly fill any empty areas around the artwork with shredded paper. The more snug the fit, the less the potential for damage. Seal the box thoroughly with packing tape, reinforcing the corners.
Step 10 – Affix the shipping label to the package and put clear tape over the label so it doesn’t get removed during shipment. Using a felt tip pen, write “FRAGILE” in large capital letters on the package, or use ready-made “FRAGILE” labels.
Rolled Canvas Paintings
Paintings on canvas up to 72”x72” may be taken off its stretchers, rolled, and shipped in a heavy duty mailing tube between 8” and 12” diameter, depending on the size of the canvas. Make absolutely certain that your painting is completely dry before attempting to roll it.
What you’ll need:
- Glassine paper or acid-free archival tissue paper
- Heavy duty mailing tube with plastic end caps no smaller than 8” in diameter and up to 12” (depending on the size of your canvas).
- A second tube of smaller diameter for inner support. (You’ll roll your artwork around this tube and insert it inside the larger tube.)
- Packing tape
- Bubble wrap
Step 1 – Sandwich your canvas between two layers of acid free archival paper. Make sure that the canvas is completely covered by the paper.
Step 2 – Roll the paper-covered artwork—paint side outward—around the smaller tube to provide inner support.DO NOT roll too tightly as this can damage the painting!
Step 3 – Next, roll a layer of bubble wrap around the artwork for padding and to seal out moisture. Seal completely with tape.
Step 4 – Place this tube within the outer mailing tube. Fill extra space at the ends with extra bubble wrap, but take care not to crush the edges of your painting. Place the end caps on and seal them shut with packing tape.
Step 5 – Affix the shipping label to the package and put clear tape over the label so it doesn’t get removed during shipment. Clearly mark the tube as “FRAGILE.”
How to package your flat artworks: Drawings, Photography, Collage
Please follow the instructions appropriate for your work.
Flat Artworks Under 48”x48”
What you’ll need:
- Glassine paper or acid-free archival tissue paper
- Plastic sheeting, poly wrap, or plastic bag
- Archival quality foam board at least ½” thick or two-ply cardboard
- Bubble wrap or shredded/wadded clean white paper
- Packing tape
- Cardboard box
Step 1 – Wrap the painting in acid-free, archival tissue paper or glassine. Note that any material that comes into contact with the surface of the work should be archival quality. We advise that you avoid touching the painting’s surface with bare hands by wearing white cotton gloves or placing acid-free tissue paper between the work and your fingers when handling.
Step 2 – Take four (4) 8”x 8” square pieces of glassine paper or acid-free tissue paper (you may adjust the size of the squares to better fit the size of your work) and fold each in half diagonally to create a triangle, then fold in half again to create a triangle pocket. Place one pocket onto each corner of the painting.
Step 3 – Taping only onto the tissue paper corners, tape the wrapped painting to a sheet of foam board (or two-ply cardboard) the same size or slightly larger than the painting for a firm backing.
Step 4 – To protect against moisture, wrap the glassine-covered artwork with plastic sheeting/poly wrap or put it inside a heavy plastic bag. Use tape to seal all areas where water can enter and cause damage.
Step 5 – Place the wrapped artwork between 2 pieces of foam board (or two-ply cardboard), forming a “sandwich”. Also, the borders of the foam board should extend a minimum of 2-3 inches beyond all edges of the artwork. Use packing tape to bind the foam board sandwich together, adding extra tape to the corners for reinforcement. Make certain the sides are taped down firmly to ensure that the artwork doesn’t shift around within.
Step 6 – Place the foam board-covered artwork into a cardboard box with approximately three (3) inches of space on all sides. Fill the empty space with bubble wrap or wadded/shredded clean white paper to ensure that the artwork doesn’t shift during transit. Seal the box completely shut with packing tape, reinforcing the corners.
Step 7 – Affix the shipping label to the package and put clear tape over the shipping label so it doesn’t get removed during shipment. With felt tip pen, write “FRAGILE” in large capital letters on the box, or use ready-made “FRAGILE” labels.
Framed Flat Artwork
Follow the instructions below for framed flat artworks of any size.
What you’ll need:
- Glassine paperAcid-free archival tissue paper
- Plastic sheeting or poly wrap
- Bubble wrap
- Painters tape (if packing a glass frame)
- Cardboard corner protectors
- Packing tape
- Foam board at least ½” thick or two-ply cardboard
- Shredded or wadded white paper
- Very sturdy cardboard box if artwork is under 18”x24”
- Custom wooden crate if artwork is over 18”x24”
Step 1 – Use a sturdy cardboard box or build a custom crate that will fit the framed painting plus approximately three (3) inches of space on all sides. (This extra space will accommodate the layers of bubble wrap to be added.)
Step 2 – If the frame has a protective glass or acrylic pane, remove it from the frame. If it doesn’t, skip to step 6 now.
Step 3 – Apply two pieces of painters tape diagonally across the glass/acrylic pane to form a large “X”. Should the glass break during shipment, the tape will help keep the broken pieces together.
Step 4 – Sandwich the glass/acrylic pane between two sheets of foam board (or cardboard) approximately 2 inches larger than the glass on all sides. Firmly seal the foam board sandwich all around with packing tape, making sure that the glass/acrylic panel does not shift around within.
Step 5 – Wrap the foam board sandwich (with glass/acrylic pane inside) with bubble wrap and seal with tape. You’ll pack this alongside the framed artwork within the box or crate.
Step 6 – Wrap the painting in acid-free, archival tissue paper or glassine. Note that any material that will come into contact with the surface of the painted work should be archival quality.
Step 7 – To protect against moisture, wrap the artwork with plastic sheeting or poly wrap.
Step 8 – Wrap the framed painting in three (3) layers of bubble wrap, using packing tape to secure it.
Step 9 – Add cardboard corner protectors to the corners of the wrapped work. You can buy corner protectors ready made, or you can construct them yourself. A quick search on Google will lead you to several resources offering instructions on how to make them.
If your framed painting is larger than 18”x24”, you’ll need to build a wooden crate and seal the work inside. Please follow the steps within the section about Crates.
If your framed painting is under 18”x24”, proceed to Step 10 below.
Step 10 – Sandwich the wrapped painting between two sheets of foam board and tape all the way around to secure it.
Step 11 – Place it inside a sturdy cardboard box. To minimize movement within the box, thoroughly fill any empty areas around the artwork with shredded paper. The more snug the fit, the less the potential for damage. Seal the box completely shut with packing tape, reinforcing the corners.
Step 12 – Affix the shipping label to the package and put clear tape over the label so it doesn’t get removed during shipment. Clearly mark the crate as “FRAGILE.”
Rolled Paper Artwork
Paper artworks such as sketches, photographs, watercolors, etc., may be rolled and shipped in a heavy duty mailing tube between 8” and 12” diameter, depending on the size of the work.
What you’ll need:
- Heavy duty mailing tube with plastic end caps no smaller than 8” in diameter and up to 12” (depending on the size of your canvas).
- A second tube of smaller diameter for inner support. (You’ll roll your artwork around this tube and insert it inside the larger tube.)
- Packing tape
- Glassine or acid-free archival paper
- Bubble wrap
Step 1 – Sandwich your artwork between two layers of glassine or acid free archival paper. Make sure that the work is completely covered by the paper.
Step 2 – Roll the paper-covered artwork around the smaller tube to provide inner support.
Step 3 – Next, roll a layer of bubble wrap around the artwork for padding and to seal out moisture. Seal completely with tape.
Step 4 – Place this tube within the outer mailing tube. Fill extra space at the ends with extra bubble wrap, but take care not to crush the edges of your artwork. Place the end caps on and seal them shut with packing tape.
Step 5 – Affix the shipping label to the package and put clear tape over the label so it doesn’t get removed during shipment. With a felt tip pen, mark the tube as “FRAGILE” in large capital letters.
Sculptures
Since sculptures vary widely in terms of size, weight, delicacy, etc., it’s impossible to provide a set of directions that will work for all. Please use these directions as general guidelines, and, if you’re at all in doubt, please email or call us for packing instructions tailored to your piece.
What you’ll need:
- Bubble wrap
- Packing tape
- Shredded paper
- Sturdy cardboard box for sculptures smaller than 12” and weighing under 5 lbs
- Custom wooden crate for sculptures (see: Crates)
Step 1 – Securely wrap the top half of the sculpture several times around with bubble wrap. How many layers you use depends upon the form and fragility of the work. Remember to pay attention to especially delicate portions of the sculpture. Cut the bubble wrap and secure the cut edge with tape.
Step 2 – Add protective top layers over the work using several pieces of bubble wrap large enough to cover and overlap the previously applied wrapping. Seal all around with tape.
Step 3 – Wrap the bubble wrap around the bottom half of the sculpture several times. Make sure to overlap the bubble wrap applied to the top half of the sculpture to ensure full coverage. Cut the bubble wrap and secure the cut edge with tape. Also, use the tape to seal the overlapped seam in the middle where the 2 pieces of bubble wrap meet.
Step 4 – As you did with the top of the work, create bottom protective layers for the sculpture with pieces of bubble wrap large enough to overlap the previously applied layers on the bottom half of the artwork. Seal it all around with tape.
If your sculpture is less than 12” tall and weighs under 5 lbs, you’ll ship it within a sturdy cardboard box. Please proceed to Step 5.
If your sculpture is over 12” tall and/or weighs more than 5 lbs, you’ll ship it in a custom wooden crate. For instructions on how to build a crate, please follow Steps 1 -7 in the section, Crates. Then, return to these instructions, starting with Step 5.
Step 5 – Before placing the wrapped sculpture inside, fill about 1/3 of the box or crate with shredded paper. If using a cardboard box, reinforce the bottom of the box with extra packing tape (across the flaps and up the sides) before filling with paper. Make a shallow well in the center of the shredded paper and set the sculpture inside of it. Fill the remainder of the box with shredded paper, surrounding the sculpture. Make sure you securely pack the shredded paper around the sculpture to minimize internal movement as much as possible during shipment.
IMPORTANT: Make sure that the crate or box’s dimensions are approximately two (2) to three (3) inches larger on all sides than the sculpture itself for sufficient buffering. Also, there should be more shredded paper underneath the sculpture than elsewhere due to gravity compression.
Step 6 – If you are using a cardboard box, seal the opening securely with packing tape using the H-taping method. The H-taping method involves using long strips of packing tape to completely seal the opening flaps of the box. Use one long strip of tape over the horizontal opening between the two flaps, and two strips over the vertical sides of the flaps—forming an “H.” Apply additional vertical strips of tape as needed across the sealed flaps for added reinforcement. Illustrations of this method are provided by different sources online. Just type “H-taping method” into the Google search box.
If you’re using a wooden crate, seal the top lid shut with screws ONLY (no glue) so that it is easily removable by the collector.
Step 7 – Clearly indicate on the crate or box which side is the bottom and which is the top by writing “THIS SIDE UP” and by drawing an upward pointing arrow on all of the side panels to let shippers know which direction the crate/box should be held or set down. Or, you may purchase ready-made “This side up” labels.
Step 8 – Clearly indicate which panel is the removable lid by writing “UNSCREW THIS SIDE ONLY” so the collector knows which panel to remove. . If needed, write any instructions (using a black felt tip pen) on the crate that will help the collector easily remove the lid.
Step 9 – Affix the shipping label to the outside and put clear tape over the label so it doesn’t get removed during shipment. Clearly mark the crate or box as “FRAGILE” in large capital letters using a heavy black felt tip pen, or use ready-made “FRAGILE” labels.
Please follow the instructions appropriate for your work. For complete instructions, download our complete Packaging Guidelines (which also includes information on the common causes of artwork damage, the proper packing materials, links to additional resources, and more) located at the bottom of this article.
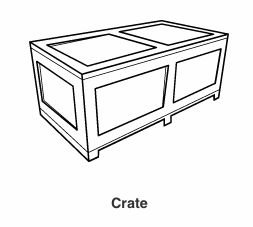
Crates
Use a custom crate for artworks such as sculpture, large flat artworks, paintings larger than 48″x48″, and fragile items.
What you’ll need:
- Four (4) planks of plywood (¼ to ½ inch thick depending on size and fragility of the work) for the frame
- Two (2) plywood sheets for the front and back panels
- Drill
- Saw
- 1¼ inch wood screws
- Wood glue
- Foam board, ½” thick
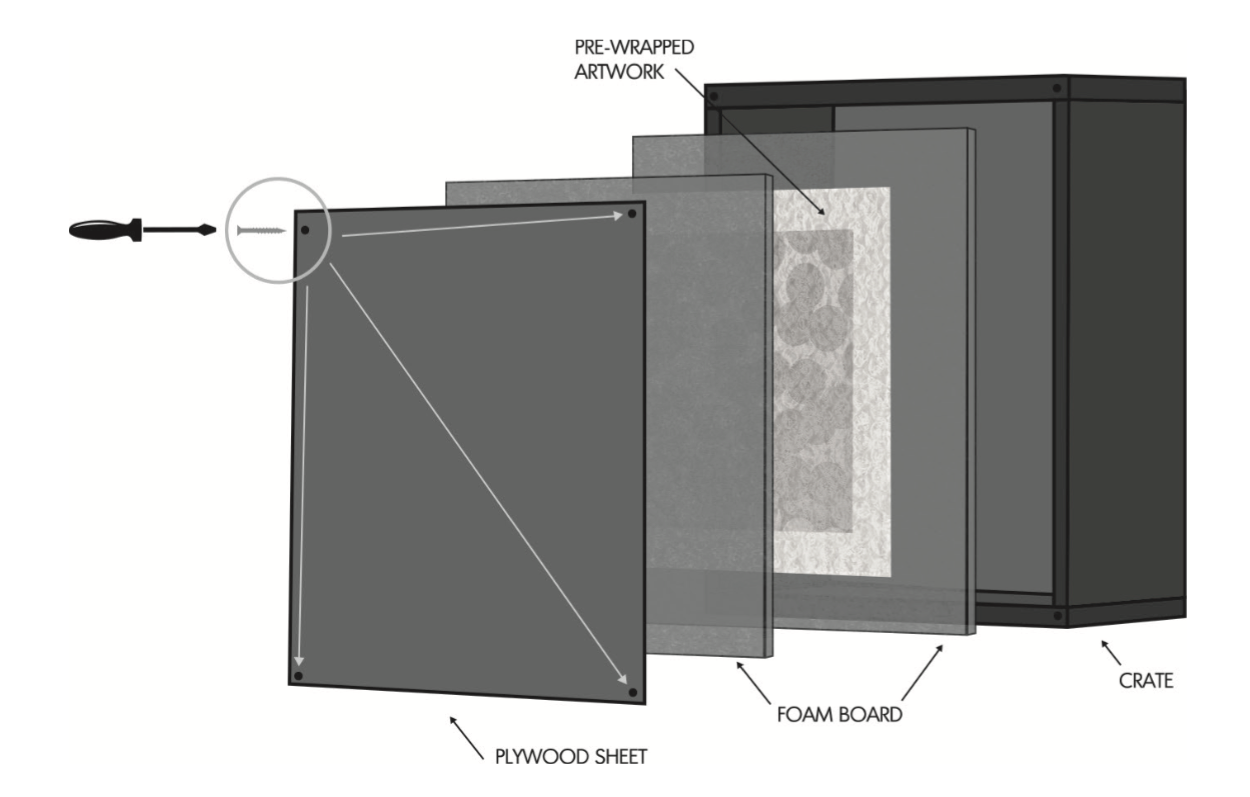
Step 1 – Measure your pre-wrapped artwork (wrapped according to the instructions given for your particular work), taking down the height, width, and depth of the wrapped piece. If you’re shipping a painting, use these measurements to calculate the dimensions of your plywood pieces for the frame of your crate. Keep in mind that you will add a ½” foam board lining to your crate, so accommodate for this. If you’re shipping a sculpture, make sure that the crate’s dimensions are approximately three (3) to four (4) inches larger on all sides than the sculpture itself. The extra space will be filled with bubble wrap and shredded paper.
Step 2 – Cut four pieces of plywood according to the dimensions you took in step 1 in order to build a frame with an opening that can snugly fit your wrapped work. Remember to account for the thickness of the plywood when measuring length and height, and cut accordingly. The top piece of the frame should sit on and extend over the top edges of the side pieces, as it must be easily removable. This piece will act as the crate’s lid, to be unscrewed by the collector.
Step 3 – Begin building the frame by assembling three (3) of the plywood strips together with screws and wood glue, leaving the top piece (i.e. lid) off for now. It will be screwed on after the artwork has been placed inside.
Step 4 – Line the frame with strips of foam board, securing them on with tape or glue. If using glue to line the crate with foam board, wait for it to dry before finishing the packing process.
Step 5 – Cut two sheets of plywood to the same dimensions of the assembled frame. These will be the front and back panels of your crate.
Step 6 – Secure one sheet to the back of the frame using wood glue and screws.
Step 7 – You will then complete the packaging process by placing your artwork inside and sealing the crate around it. Lay a piece of foam board (the same size as the frame) inside the open crate, and place your pre-wrapped artwork on top. There should be no room for movement inside.
Step 8 – Cover your artwork with another layer of foam board. Place the other sheet of Masonite board on top of the frame, securing well with wood glue and screws. Do your best to ensure that the crate is air and moisture tight.
Step 9 – Clearly indicate which panel is the removable lid by writing “UNSCREW THIS SIDE ONLY” so the collector knows which panel to remove. If needed, write any instructions (using a black felt tip pen) on the crate that will help the collector easily remove the lid.
Step 10 – Affix the shipping label to the outside and put clear tape over the label so it doesn’t get removed during shipment. Clearly mark the crate or box as “FRAGILE.”
TIP: For ease of transport, you can screw a cabinet handle to the top of the crate. The screws should be long enough so that the handle doesn’t come loose while someone is carrying the crate, but not so long that they protrude into the interior of the crate.
Please follow the instructions appropriate for your work. For complete instructions, download our complete Packaging Guidelines (which also includes information on the common causes of artwork damage, the proper packing materials, links to additional resources, and more) located at the bottom of this article.